
Introduction
Hello everyone! Welcome back to our series on "What I Know About MongoDB", focusing on the highly popular NoSQL DB - MongoDB. In this article, I'll walk you through the process of installing MongoDB as a standalone and some basic operations, such as creating a database, collections, and performing basic CRUD operations.
Installing MongoDB
MongoDB can be installed on various platforms, from package installations on operating systems like Linux, MacOS, and Windows, to using Docker or setting it up on Kubernetes via helm charts.
In this guide, I'll focus on installing MongoDB on Linux, specifically Ubuntu version 20.04. The installation steps for other operating systems are quite similar. You can refer to this link for further details.
Illustrative image
Installing MongoDB on Ubuntu 20.04
I will be installing MongoDB 6.0 Community Edition on Ubuntu 20.04 LTS Focal. The installation process is straightforward; just follow the steps below!
Step 1: Add a key for the MongoDB repository
wget -qO - https://www.mongodb.org/static/pgp/server-6.0.asc | sudo apt-key add -
If the result says "OK", you're successful. If there's an error, execute the next command and then repeat the previous step:
sudo apt-get install -y gnupg
wget -qO - https://www.mongodb.org/static/pgp/server-6.0.asc | sudo apt-key add -
Step 2: Add the repository for MongoDB installation
echo "deb [ arch=amd64,arm64 ] https://repo.mongodb.org/apt/ubuntu focal/mongodb-org/6.0 multiverse" | sudo tee /etc/apt/sources.list.d/mongodb-org-6.0.list
Step 3: Update the local repository
sudo apt update -y
Step 4: Install the MongoDB package
sudo apt-get install -y mongodb-org
A note when installing via OS package: to prevent the MongoDB package from auto-updating when updating the repository, follow these commands:
echo "mongodb-org hold" | sudo dpkg --set-selections
echo "mongodb-org-database hold" | sudo dpkg --set-selections
echo "mongodb-org-server hold" | sudo dpkg --set-selections
echo "mongodb-mongosh hold" | sudo dpkg --set-selections
echo "mongodb-org-mongos hold" | sudo dpkg --set-selections
echo "mongodb-org-tools hold" | sudo dpkg --set-selections
Starting MongoDB
A Note on ulimit Configuration
You should set the ulimit value for max-open-files to at least 64000, otherwise the mongod service will throw an error. The ulimit value is set per OS user, so ensure it's correctly set for the user running MongoDB.
When you install using a package manager, like apt for Ubuntu as shown above, the ulimit value is automatically configured. You can verify it as follows:
Step 1: Check the PID for mongod
root@mongodb-standalone:/etc/systemd# ps -ef |grep mongod |grep -v grep
mongodb      475       1  0 14:59 ?        00:00:04 /usr/bin/mongod --config /etc/mongod.conf
Step 2: Examine the ulimit values for the process (in this case, PID=475)
root@mongodb-standalone:/etc/systemd# cat /proc/475/limits
You will see the "Max open files" parameter set to 64000.
Configuration of the mongod Service
When you install the mongodb-org package, a default service named mongod is created, defined by the configuration file at /lib/systemd/system/mongod.service.
This configuration file contains parameters for running the service, including an essential parameter named ExecStart:
ExecStart=/usr/bin/mongod --config /etc/mongod.conf
You can observe that the main configuration file to run this service is /etc/mongod.conf. You can customize the path to this service's configuration file as well as modify parameters within this config:
storage:
  dbPath: /var/lib/mongodb
systemLog:
  destination: file
  logAppend: true
  path: /var/log/mongodb/mongod.log
net:
  port: 27017
  bindIp: 127.0.0.1
Key configuration parameters to note:
storage:Path to the directory containing MongoDB datasystemLog: Path to the directory containing logs for this mongod servicenet:Declares Port and IP for binding. By default, it binds to Port 27017 on localhost (127.0.0.1). Therefore, from another host, you cannot connect to the database unless you bind it to other interfaces of the host.
Running MongoDB
After checking and possibly customizing the configuration parameters, you can start MongoDB. If you've made changes to the service configuration file, you'll need to reload it with:
sudo systemctl daemon-reload
Then, start MongoDB with:
sudo systemctl enable mongod
sudo systemctl start mongod
Successful mongod startup looks like this:
ubuntu@mongodb-standalone:~$ sudo service mongod status
● mongod.service - MongoDB Database Server
     Loaded: loaded (/lib/systemd/system/mongod.service; enabled; vendor preset: enabled)
     Active: active (running) since Sat 2023-03-18 14:59:01 UTC; 30min ago
       Docs: https://docs.mongodb.org/manual
   Main PID: 475 (mongod)
     Memory: 229.2M
     CGroup: /system.slice/mongod.service
             └─475 /usr/bin/mongod --config /etc/mongod.conf

Mar 18 14:59:01 mongodb-standalone systemd[1]: Started MongoDB Database Server.
Getting Started with MongoDB
At this point, MongoDB is up and running. You can begin connecting to the database using the mongosh command on the server where MongoDB is installed.
ubuntu@mongodb-standalone:~$ mongosh
Current Mongosh Log ID: 6415d80bfe9ee8d719c45af1
Connecting to:          mongodb://127.0.0.1:27017/?directConnection=true&serverSelectionTimeoutMS=2000&appName=mongosh+1.8.0
Using MongoDB:          6.0.5
Using Mongosh:          1.8.0
For mongosh info see: https://docs.mongodb.com/mongodb-shell/
test>
Now, you're connected to MongoDB and by default, you're connected to a database named test.
Basic Operations with MongoDB
First, it's worth noting that some MongoDB concepts differ from those in other Rational Databases.
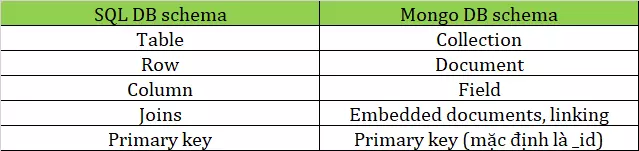
Hence, in MongoDB, the structure is: database => collection => document => field.
Creating a new database in MongoDB with mongosh
Upon your initial connection to MongoDB, you're connected to a blank database named test. To see a list of databases in the system, use:
test> show dbs
admin   40.00 KiB
config  48.00 KiB
local   72.00 KiB
Note: the test database, being blank, isn't listed in the show dbs command.
To create a new DB, use the use [database-name] command:
test> use demo
switched to db demo
demo>
Now, a blank database named demo is created, and you are switched to it. The prompt indicates which database you're operating on.
Creating a New Collection in the Database
There are two ways to create a collection in MongoDB:
- Create with the createCollection command
- Create by inserting data into a collection (the collection is created if it doesn't already exist)
Creating a collection using the createCollection command
You can create a new Collection named "staff" as follows:
demo> db.createCollection("staff")
{ ok: 1 }
Creating a collection using the insertOne command
demo> db.demo_collection.insertOne({name: "Trinh Quoc Viet", age: "18", gender: "male", cert: ["AWS", "Azure"] })
{
  acknowledged: true,
  insertedId: ObjectId("6415dc28914137d28a613d06")
}
Inserting into a Collection
To insert a single document into a collection, use the insertOne command
demo> db.staff.insertOne({name: "Nguyen Hoang Anh", age: "21", gender: "male", cert: ["GCP", "Azure"] })
{
  acknowledged: true,
  insertedId: ObjectId("6415e280914137d28a613d0b")
}
To insert multiple documents into a collection, use the insertMany command:
db.staff.insertMany([
  {
    name: "David Tinker",
    age: "21",
    gender: "male",
    cert: ["AWS", "Azure"]
  },
 {
    name: "Gwen Sherry",
    age: "20",
    gender: "female",
    cert: ["AWS", "CKA", "CKAD"]
  }
])
Result:
{
  acknowledged: true,
  insertedIds: {
    '0': ObjectId("6415df0b914137d28a613d08"),
    '1': ObjectId("6415df0b914137d28a613d09")
  }
}
Querying Data in Collections (Using the find method)
There are two ways to use the find function in MongoDB: find() and findOne().
Using find()
To select data from a MongoDB collection, we use the find() method. This method can accept a query object to filter the data. If you leave the filter condition empty, it will return all documents from that collection.
Example to select all from the staff collection:
demo> db.staff.find()
[
  {
    _id: ObjectId("6415df0b914137d28a613d08"),
    name: 'David Tinker',
    age: '21',
    gender: 'male',
    cert: [ 'AWS', 'Azure' ]
  },
  {
    _id: ObjectId("6415df0b914137d28a613d09"),
    name: 'Gwen Sherry',
    age: '20',
    gender: 'female',
    cert: [ 'AWS', 'CKA', 'CKAD' ]
  },
  {
    _id: ObjectId("6415e280914137d28a613d0b"),
    name: 'Brian Glen',
    age: '21',
    gender: 'male',
    cert: [ 'GCP', 'Azure' ]
  }
]
demo>
Using findOne()
Use the findOne() method when you want to select just one document. This method also takes a query object, and if left blank, it will return the first document it finds.
demo> db.staff.findOne()
{
  _id: ObjectId("6415df0b914137d28a613d08"),
  name: 'David Tinker',
  age: '21',
  gender: 'male',
  cert: [ 'AWS', 'Azure' ]
}
Data Filtering
You can filter data based on parameters, like filtering for staff whose gender is male:
demo> db.staff.find({"gender": "male"})
[
  {
    _id: ObjectId("6415df0b914137d28a613d08"),
    name: 'David Tinker',
    age: '21',
    gender: 'male',
    cert: [ 'AWS', 'Azure' ]
  },
  {
    _id: ObjectId("6415e280914137d28a613d0b"),
    name: 'Brian Glen',
    age: '21',
    gender: 'male',
    cert: [ 'GCP', 'Azure' ]
  }
]
Using Projection to Select Specific Fields
You can choose specific fields by using the second parameter in the find() method called projection. For instance, if you only want the name and certifications of male staff:
demo> db.staff.find({"gender": "male"},{name:1 , cert: 1})
[
  {
    _id: ObjectId("6415df0b914137d28a613d08"),
    name: 'David Tinker',
    cert: [ 'AWS', 'Azure' ]
  },
  {
    _id: ObjectId("6415e280914137d28a613d0b"),
    name: 'Brian Glen',
    cert: [ 'GCP', 'Azure' ]
  }
]
demo>
To exclude specific fields, such as "_id", set its value to 0 in the projection configuration:
demo> db.staff.find({"gender": "male"},{_id: 0, name:1 , cert: 1})
[
  { name: 'David Tinker', cert: [ 'AWS', 'Azure' ] },
  { name: 'Brian Glen', cert: [ 'GCP', 'Azure' ] }
]
demo>
Updating Data in a Collection
To update data within a collection, you can utilize the updateOne() or updateMany() methods. The first parameter for these methods is a query condition to select which documents to update.
The second parameter is an object defining the data to be updated.
The updateOne() Method
The updateOne() method updates the first document that matches the query condition. For example, let's say we want to update the age of male employees to 20:
Data before update:
demo> db.staff.find({"gender": "male"})
[
  {
    _id: ObjectId("6415df0b914137d28a613d08"),
    name: 'David Tinker',
    age: '21',
    gender: 'male',
    cert: [ 'AWS', 'Azure' ]
  },
  {
    _id: ObjectId("6415e280914137d28a613d0b"),
    name: 'Brian Glen',
    age: '21',
    gender: 'male',
    cert: [ 'GCP', 'Azure' ]
  }
]
Perform the Update
demo> db.staff.updateOne({"gender": "male"}, {$set: { "age": 20 }} )
{
  acknowledged: true,
  insertedId: null,
  matchedCount: 1,
  modifiedCount: 1,
  upsertedCount: 0
}
After the update, only the first found record has been updated:
demo> db.staff.find({"gender": "male"})
[
  {
    _id: ObjectId("6415df0b914137d28a613d08"),
    name: 'David Tinker',
    age: 20,
    gender: 'male',
    cert: [ 'AWS', 'Azure' ]
  },
  {
    _id: ObjectId("6415e280914137d28a613d0b"),
    name: 'Brian Glen',
    age: '21',
    gender: 'male',
    cert: [ 'GCP', 'Azure' ]
  }
]
The updateMany() Method
This method updates all documents that match the query condition. For instance, let's update all male employees' age to 25:
demo> db.staff.updateMany( {"gender": "male"}, {$set: { "age": 25 }} )
{
  acknowledged: true,
  insertedId: null,
  matchedCount: 2,
  modifiedCount: 2,
  upsertedCount: 0
}
After the update, all records satisfying the search condition have been updated:
demo> db.staff.find({"gender": "male"})
[
  {
    _id: ObjectId("6415df0b914137d28a613d08"),
    name: 'David Tinker',
    age: 25,
    gender: 'male',
    cert: [ 'AWS', 'Azure' ]
  },
  {
    _id: ObjectId("6415e280914137d28a613d0b"),
    name: 'Brian Glen',
    age: 25,
    gender: 'male',
    cert: [ 'GCP', 'Azure' ]
  }
]
Deleting Data in a Collection
Similarly to the insert or update commands, MongoDB offers two delete methods: deleteOne() and deleteMany(). As the names suggest, deleteOne() deletes the first document that meets the filter condition, while deleteMany() deletes all documents that match.
Example of deleting a female employee:
demo> db.staff.deleteOne({"gender": "female"})
{ acknowledged: true, deletedCount: 1 }
Delete all male employees:
demo> db.staff.deleteMany({"gender": "male"})
{ acknowledged: true, deletedCount: 2 }
Some Operations with Databases and Collections
Listing all collections in a database:
db.getCollectionNames()
Delete a collection:
db.collection_name.drop()
db.staff.drop()
Delete a database:
demo2> db.dropDatabase()
{ ok: 1, dropped: 'demo2' }
Through this article, I hope those new to MongoDB will be able to set up a lab system and perform basic operations with MongoDB.
In the next article, I'll guide you on how to set up a full-fledged MongoDB sharded cluster with all components ensuring redundancy, high availability, and scalability using sharding and replication.
If you find this post helpful, please support by upvoting it to motivate me further!
See you in the next part!


0 Comments